Pages

Showing posts with label sewing. Show all posts

Tuesday, June 4, 2013

How to Save a Favorite Dress


I bought this dress at H&M a couple months before I got married (way back in 2007).  I didn't have very many dresses at that point in my life, and I really loved this one.  I think it cost about $15.  I've worn it way more than 15 times.  If I'm honest with myself, the top has never been ideal for my body type.  I always had to wear a camisole underneath to keep it decent.  In the last 6 years, I may have gained a few inches around my whole self, so the fitted top didn't really fit at all anymore.  The last time I wore it, I did the "dress as a skirt" trick.  At that point, I thought I should really chop it into a skirt.  Almost a year later, I finally got around to it!

This was really easy, and didn't take much time!  I could see myself doing this again with other dresses - maybe even searching the thrift store with skirt-ifying in mind.  Here's what I did: 

Step 1 was dealing with the zipper in the back.  I just did a little seam ripping, and then sewed a new seam where the zipper had been.  This was pretty easy, because I could just follow the thread lines that were already there!


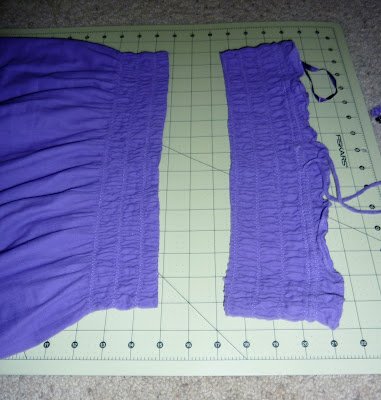
Step 2 is where I had to commit!  I'm not a precision person AT ALL, so I just used the current waist as a guide and chopped the skirt part off!  


Step 3 was pinning around the elastic, so I would know where to sew my new band.  I left the elastic in, so I could be sure it would fit in the tube I sewed.

I left about 2 inches open, so I could play around with how much elastic to use.  I threaded the elastic through the tube with a bodkin (which is super useful) and then put the skirt on and safety pinned the elastic together where it was comfortable for me.  I wanted the skirt to still be flowy/drapey, so I arranged the fabric somewhat evenly around the new waistband, and sewed up the rest of the waistband part.

This last part is optional, but I wanted to keep the elastic from twisting, and I wanted to keep the gathers somewhat even, so I tacked the waistband in at the back and on the sides.

Here's the final product!  I'm pretty excited for my new skirt.  
 

Do you ever refashion your clothes?  Any clever ideas that I should try?

Tuesday, June 26, 2012

DIY Pillowcase Dresses


This is my favorite project from when my nieces were visiting, and quite possibly my favorite project ever.  I've had my eye on some pillowcase dress tutorials, but with this project, I was really not that interested in following directions.  Sometimes, I would just rather wing it!

So, we went to Walmart to find some pillowcases and ribbons.  First, we had picked out some really basic gray pillowcases, thinking any ribbon would go well with it.  Then we saw an end-cap display with fun pillowcases, including these polka dotted ones.  SOLD!

Then we went to the ribbon aisle and let the girls pick out whatever ribbon they wanted (within reason).  I think both of their choices were super cute!

So, then we got started!  My sister helped out quite a bit on this project.  We worked after the girls were asleep, and had some pretty awesome sister time while we were working. 

Step 1:  Seam-rip the closed end of the pillow-cases.  NOTE:  depending on the type of fabric you are using, you might need to stitch a little hem after you rip the seam.  This fabric was fraying quite a bit, so I did a quick zigzag stitch to keep it in check.

Step 2:  Cut the armholes.  This is not an exact science.  We used another dress as a guideline.  Then I just made about a 1/4 inch fold and sewed around that, to make a finished edge.  You could also use bias tape.  

Step 3 (optional):  Sew the ribbon around the bottom of the pillowcase.  I just think this adds some extra cuteness and interest to the dress.  In these pictures, we were just making sure the dresses were long enough.  For taller kids, you could probably sew a band of extra fabric around the bottom to get the right length. 
Delia
Matti

Step 4:  Measure how wide your ribbon is, and fold the top section down so the ribbon will fit through without bunching.  Then sew that on both front and back.

Step 5:  This was the one part the girls got to help with!  Sliding the ribbon into the slots on the front and back.  I have a bodkin, which makes this super easy.  They did a great job!

Matti and me, and my mess of supplies
Delia, with iCarly in the background


Step 6:  Once the ribbon was threaded through, we had to check the fit.  We decided to just have a bow on one shoulder, but I've seen them with bows on both side.  I mostly just made sure the straps would fit right, and that the arm holes weren't too big. 
fitting Matti

Then I sewed the ribbons into place, and took in the sides a little bit, to make it more A-line, and we were good to go!

Now I want to try making a dress like this for me.  Obviously, I won't be able to start with a pillowcase, but it wouldn't be too hard to start from scratch, right?  I'm thinking something like this.

What other easy sewing projects should I try out??

I'm linking up with The Pretty Pinhead today.  Go check out the other bloggers!

Sunday, June 24, 2012

Transformers


I have a confession to make:  this skirt isn't really a skirt.  It's a dress.  I just have the top folded over to make it a skirt.  In fact, I liked it so much as a skirt that I decided to take the plunge and officially chop it into a skirt.   So, without any further ado, here's my step-by-step instructions: 

Before - the dress

Step 1:  measure and chop.  Since this dress was more of a midi than a maxi on my giant self, I didn't have to chop very much off the top of the dress.  I also made sure to allow for folding over the waistband.


Step 2:  Turn inside out to fold over the waistband.  I just made sure it would be wide enough for the elastic to fit.  Then I pinned it. 


Step 3:  Sew around the waistband.  Leave a couple inches open to feed the elastic through. 

Step 4:  Feed the elastic through the waistband.  Then sew the ends together and sew up the opening in the waistband.

Step 5:  DONE!  Hang your new skirt up in the closet, and start pinning inspiration for how you will wear it!


Skirt (dress): Gap Outlet
Top: Preston&York via Dillard's
Cardigan: Old Navy
Shoes: Carlos Santana via DSW


Thursday, December 1, 2011

Throwback Thursday - Seatbelts and Cows


Does anyone remember when Kansas City did the Cow Parade?  I think some of the sculptures are still around in various malls and museums.  My dad and I had been in Chicago for the weekend to see the Cardinals play the Cubs, and flew back through Kansas City.  We went to the Plaza to check out the cows, and buy some new school shoes for me.  It was a great day!

This is not an impressive outfit.  I think my jeans and t-shirt were both Express, and I'm rocking Skechers tennis shoes.  No, not that exciting, but what is exciting is my purse.  Seatbelt purses hadn't really caught on in 2001, but I had seen one in a little boutique and I loved it.  It was about $75, safely out of the high school girl price range.  I decided I was going to make one.  Can't be that hard, right??
  • Step 1 was the hardest:  Find seatbelt material.  Now in 2011, that's pretty easy.  Just google "seatbelt material" and you get a bunch of websites with various colors.  10 years ago, that wasn't happening.  I finally convinced my dad to go on an adventure to the junkyard.  The guys there thought I was crazy.  I found a little Geo Metro, and had to pry the doors apart to get to the wound up seat-belts.  Blue wouldn't have been my first choice for color, but beggars can't be choosers, right?
  • Step 2 involved a lot of Dawn soap and a toothbrush to get the dirt and grease out. 
  • Steps 3-6 was the sewing process, which was mostly done by hand, as I broke a few sewing needles on the thick material: 
    •  First, I cut strips and sewed loops together
    • Then I cut strips and wove up between the strips, and sewed around the top.
    • The strap was a long piece, and I wove down both sides, and through the bottom, so it would be really strong. 
    • Then I made some lining with lime green satin, and sewed that in, using another strip of seatbelt for the binding around the top.  


I was pretty proud of myself for this project.  After this, a friend told me about an airplane supply store  downtown that had a whole aisle of different colors of seat-belts.  I got red and black and made myself and my sister each a purse, in a different style.  I'd like to make some more someday.  Maybe I will check out those websites that Google found for me to buy the supplies...

Sunday, November 27, 2011

Adventures in Sewing

A few years ago, my husband got me a sewing machine for my birthday.  I was super excited and signed up for a beginner's sewing class.  I made a purse in the class, and really regret the fabric I used.  I will likely never use the purse.  I've done a few little projects over the past couple of years, including a t-shirt quilt that is taking forever!  I should be done with it soon.  When I was at Joann's Fabric getting supplies for the quilt, I noticed patterns were on sale 5 for $5, so I picked up 5 that seemed pretty easy.  Until yesterday, I hadn't even started any of them. 

I decided I would make a skirt first.   I had some coupons for Hancock Fabrics, so I went searching for the skirt fabric.  I didn't find anything I completely loved for the skirt, but ended up with this houndstooth twill.  Got home and was anxious to get started.  This is when I realized I don't want to follow directions.  Of course, it said I should wash the fabric first, to pre-shrink.  That seemed like it would take way too long.  After considering the potential for making a skirt, only to wash it and be unable to wear it, I decided to follow the instructions.  So, the skirt fabric won't be ready for about an hour.

Instead of waiting patiently, I was anxious to sew something!  At the store, I noticed this leopard print flowy polyester fabric.  I obviously have no idea what it actually should be called.  I would fail design school.  It was too light for the skirt, but I wanted it, so I bought 2 yards, for some future project  When my skirt plan was foiled, I went to my patterns and found a simple tank top.  Should be easy, right??   I tried to follow the instructions, but I honestly had no idea what they were describing.  I had to get online and search for terms, and even watched a video on youtube about how to gather.  Eventually, I gave up on the pattern instructions and just did what made sense to me.  I think it turned out pretty cute:  


I learned a few things in the process:  
  1. I really don't like following instructions.  I would much rather wing it. 
  2. Making clothes is probably more expensive than buying.  I saw a very similar top the other day for about $14.   Once you add up the fabric/thread/pattern, and my hours, I think $14 would have been a wiser choice. 
  3. I should probably start looking at Goodwill for items I can refashion, rather than starting from scratch.  
I think I might ditch the other pattern and just make a skirt however I want.  It can't be that complicated, right??